In this guide, I will show you how to use Excel VBA to automate moving data between ranges and setting up a schedule to repeat the process at specific intervals.
This method can be useful when you need to regularly move data within a workbook without manual effort. Using the Application.OnTime method,
the task can be automated to run after a set time, making data management more efficient. Let’s walk through the steps involved in setting up this automation.
1. Setting Up Excel for VBA Automation
Before starting with the code, ensure that macros are enabled in Excel . You can do this by going to the “Developer” tab and enabling VBA macro in “Macro Settings.”
Next, open the Excel worksheet where you want to automate the task. Ensure your data is in a structured format, and VBA will help move and manage the data.
2. Writing the VBA Code
Here is the full VBA code that will automate moving data and setting up a timer for the process to repeat.
Option Explicit

Sub Helllo()
    Worksheets("Sheet1").Range("A2:C2").Select
    Selection.Cut

    lastrow = Worksheets("Sheet1").Cells(Rows.Count, 6).End(xlUp).Row

    Worksheets("Sheet1").Cells(lastrow + 1, 6).Select
    ActiveSheet.Paste
    Worksheets("Sheet1").Range("A2:C2").Select
    Selection.Delete shift:=xlUp

    Worksheets("Sheet1").Range("A2").Select
    Call test
End Sub

Sub test()
    Application.OnTime Now + TimeValue("00:01:00"), "Helllo"
End Sub
Code Breakdown
- Range Selection and Cut: The code selects the range
A2:C2on “Sheet1” and cuts it usingSelection.Cut. - Finding the Last Row in Column F: It calculates the last filled row in column F using
lastrow = Worksheets("Sheet1").Cells(Rows.Count, 6).End(xlUp).Row. - Pasting Data: The cut data is pasted into the next available row in column F.
- Deleting the Original Data: The original data from
A2:C2is deleted, and the rows are shifted up usingSelection.Delete shift:=xlUp. - Recalling the Process After One Minute: The
Application.OnTimefunction schedules theHelllosubroutine to run again after 1 minute.
3. Running the Code
To run the code:
- Open the VBA editor by pressing
Alt + F11. - Paste the code into the editor.
- Close the editor and run the macro by pressing
Alt + F8, selectingHelllo, and clicking “Run.”
4. Results of Automation
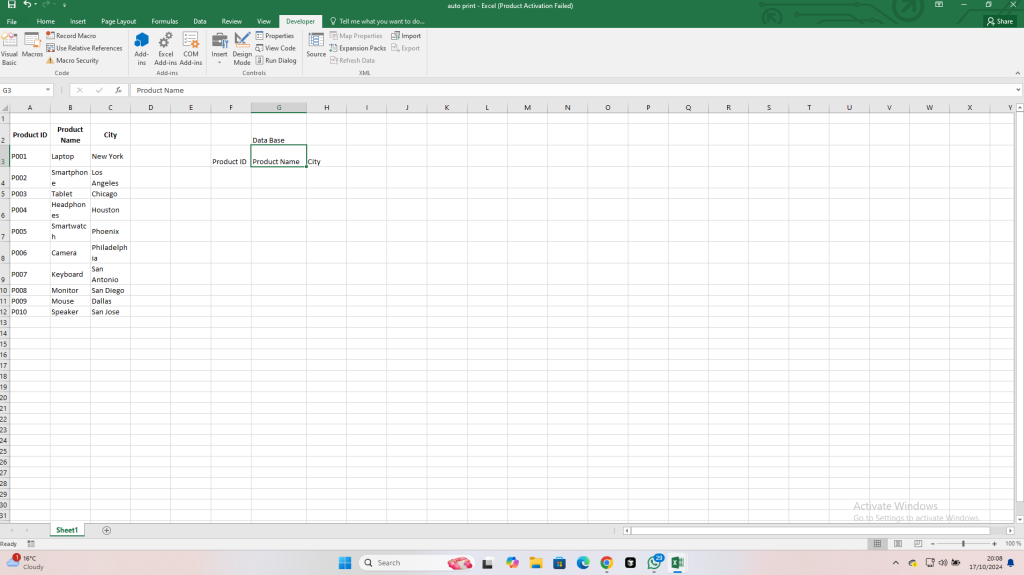
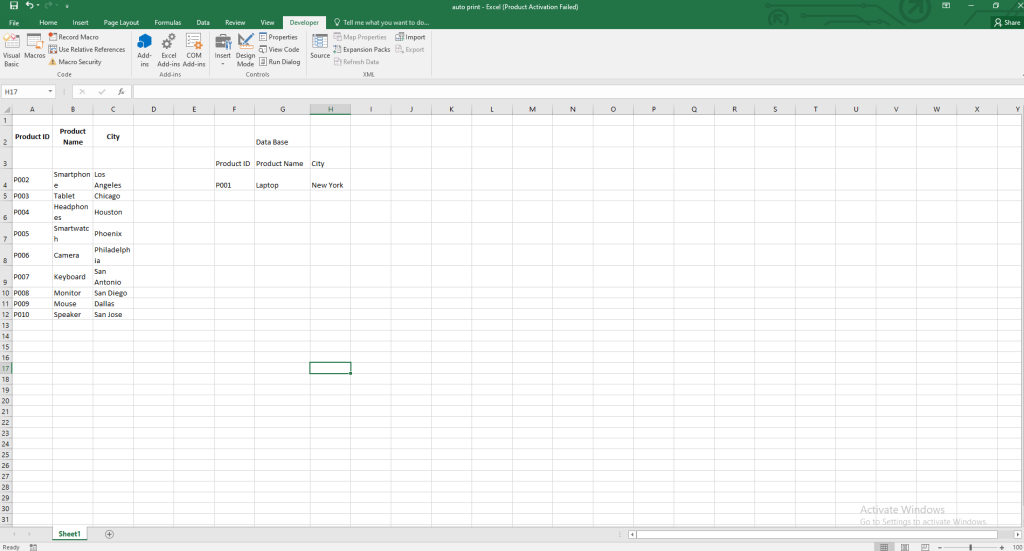
Once the code runs, it will move the data from columns A to C (row 2) and place it into the next available row in column F. The original data will be deleted, and the process will repeat after every minute, based on the time interval set in the code.
Before

After 1 minute

5. Possible Troubleshooting
- Error: “Sub or Function Not Defined”
This might happen if you misname the function. Ensure the function is calledHellloboth in the main code and theOnTimescheduling. - Data is not moving to the correct location:
Verify that the correct worksheet name is used. The code is set to run on “Sheet1,” so ensure this matches your actual sheet name. - The macro is not running automatically:
Make sure that your system allows macros and that there are no errors in the code.
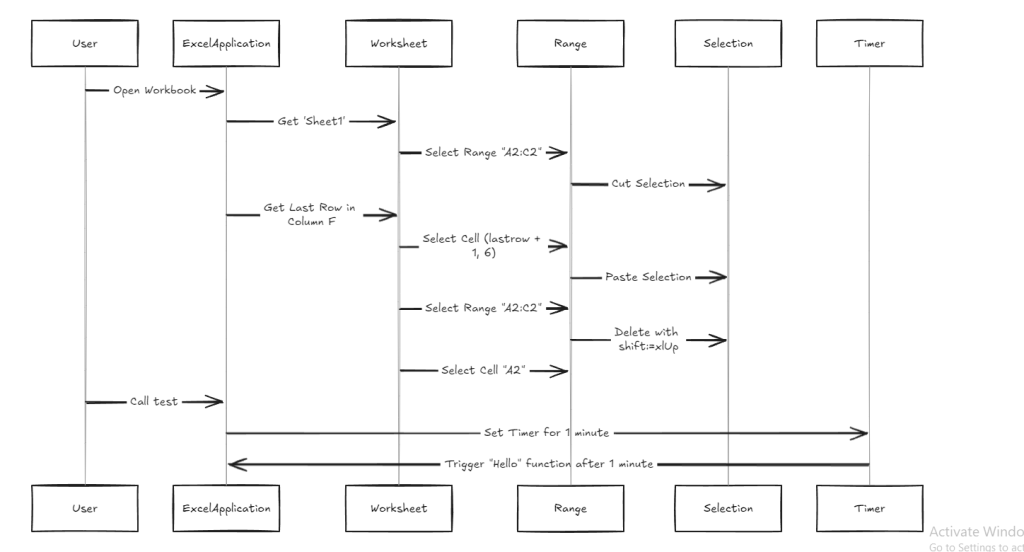
Flow Chart Of The Code

Conclusion
In this guide, you’ve learned how to automate data movement in Excel using VBA and set the process to repeat at regular intervals. This simple approach can save time and reduce manual effort when managing data across different ranges.
If you like blog post like thispost on How to Automatically Move Data Between Ranges at Intervals in Excel Using VBA then you would love our other blog post like How to Copy Excel Data to PowerPoint with a Single Button Click Using VBA

