Introduction
Editing images manually can be time-consuming, especially when you have multiple files to process.
With Python, you can simplify this task and save time by automating the process. In this guide, we’ll walk you through how to use Python to sharpen images, convert them to black and white, and save the edited versions—all in one go.
Whether you’re new to coding or just looking for a more efficient way to handle image editing, this step-by-step tutorial will help you get started.
Setting Up Your Environment
Before diving into the code, you need to ensure that your environment is ready. First, make sure Python is installed on your system. You’ll also need to install a library called Pillow, which provides powerful image processing capabilities.
To install Pillow, open your command prompt or terminal and run:
pip install pillowThis command will download and install the Pillow library, setting you up for the next steps.
Understanding the Basics
Before writing the script, let’s briefly understand what it will do. Our script will:
- Open each image in a folder.
- Apply a sharpening filter and convert it to black and white.
- Save the edited images to a new folder.
This automation will save time and ensure consistency across all your images.
Step-by-Step Guide
Setting Up Your Project
To start, create a folder for your project. Inside this folder, create two subfolders: one called images where you’ll place the original images, and another called editedImg where the edited images will be saved.
Writing the Script to Edit Images
Now, let’s dive into the code that will automate the image editing process. We’ll go through it line by line so you understand exactly how it works.
Import the Necessary Libraries
from PIL import Image, ImageEnhance, ImageFilter
import os
- from PIL import Image, ImageEnhance, ImageFilter: These are tools from the Pillow library that we’ll use to open images, enhance them, and apply filters.
- import os: This is a built-in Python library that helps us interact with the file system—things like reading files and creating directories.
Define the Paths to Your Folders
path = "./images"
pathOut = "./editedImg"
- path = “./images”: This tells the script where to find your original images. The
./imagesmeans it will look inside theimagesfolder in the current directory. - pathOut = “./editedImg”: This tells the script where to save the edited images. Again,
./editedImgmeans theeditedImgfolder in the current directory.
Create the Output Folder if It Doesn’t Exist
if not os.path.exists(pathOut):
os.makedirs(pathOut)- if not os.path.exists(pathOut): This checks if the
editedImgfolder already exists. If it doesn’t, the script moves on to the next line. - os.makedirs(pathOut): If the folder doesn’t exist, this line creates it so the script has somewhere to save your edited images.
Loop Through Each File in the images Folder
for filename in os.listdir(path):
    print(f"Processing {filename}...")
- for filename in os.listdir(path): This loops through every file in the
imagesfolder. For each file, it stores the name in the variablefilename. - print(f”Processing {filename}…”): This just prints a message in the terminal so you know which file the script is working on. It helps you keep track of the progress.
Open Each Image File
    try:
        img = Image.open(f"{path}/{filename}")
- try: This is a way to tell Python, “Try to do this, but if something goes wrong, don’t crash—just handle the problem.”
- img = Image.open(f”{path}/{filename}”): This opens the image file so we can work with it. The
f"{path}/{filename}"part tells the script the exact location of the file (inside theimagesfolder).
Apply a Filter and Convert the Image to Black & White
edit = img.filter(ImageFilter.SHARPEN).convert("L")
- img.filter(ImageFilter.SHARPEN): This applies a sharpening filter to the image, making the details more pronounced.
- .convert(“L”): This converts the image to grayscale, meaning it will be in black and white.
Get the Filename Without the Extension
clean_name = os.path.splitext(filename)[0]
- os.path.splitext(filename)[0]: This splits the filename into two parts: the name and the extension (like
.jpg). The[0]part takes only the name, leaving out the extension. This gives us a clean name to use when saving the edited image.
Save the Edited Image to the Output Folder
edit.save(os.path.join(pathOut, f"{clean_name}_edited.jpg"))
- edit.save(os.path.join(pathOut, f”{clean_name}_edited.jpg”)): This saves the edited image in the
editedImgfolder. The new file name is the original name plus_edited.jpg, so you can easily tell it’s the edited version.
Handle Any Errors
   except Exception as e:
        print(f"Failed to process {filename}: {e}")
- except Exception as e: This is where we catch any errors that happen during the try block. If something goes wrong, the script won’t crash; instead, it will move here.
- print(f”Failed to process {filename}: {e}”): This prints a message saying which file had an issue and what the error was. This way, you can troubleshoot without stopping the whole script.
The Complete Script
Now that you understand each part, here’s the complete script that you can copy into your code editor:
from PIL import Image, ImageEnhance, ImageFilter
import os

# Define paths
path = "./images"
pathOut = "./editedImg"

# Check if the output directory exists; if not, create it
if not os.path.exists(pathOut):
    os.makedirs(pathOut)

# Process each file in the input directory
for filename in os.listdir(path):
    print(f"Processing {filename}...")
    try:
        # Open the image file
        img = Image.open(f"{path}/{filename}")

        # Apply a SHARPEN filter and convert to grayscale
        edit = img.filter(ImageFilter.SHARPEN).convert("L")

        # Get the clean filename without extension
        clean_name = os.path.splitext(filename)[0]

        # Save the edited image to the output directory
        edit.save(os.path.join(pathOut, f"{clean_name}_edited.jpg"))
        print(f"Saved {clean_name}_edited.jpg")

    except Exception as e:
        print(f"Failed to process {filename}: {e}")
Running the Script After saving the script, place a few images in the images folder. Then, run the script by typing python index.py in your command prompt or terminal. The script will process each image, apply the specified edits, and save the results in the editedImg folder.
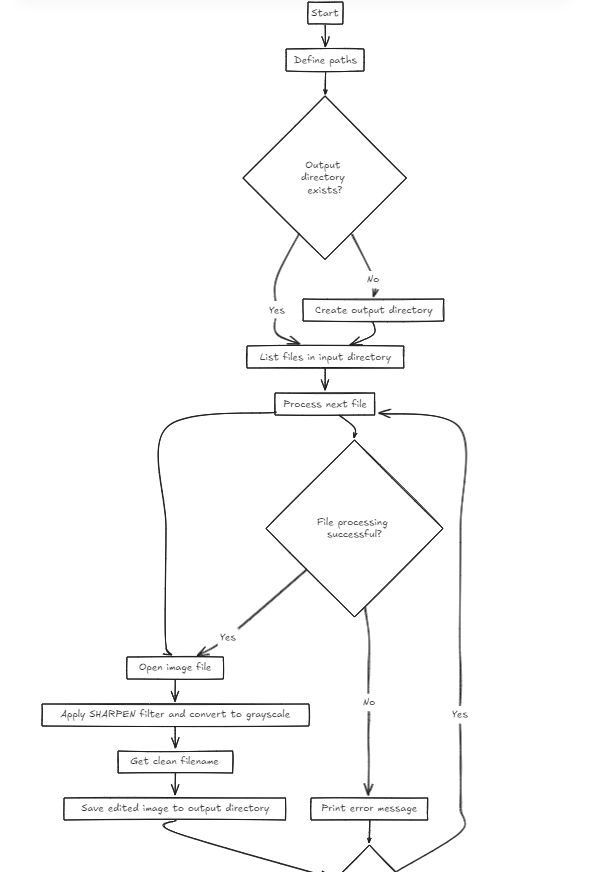
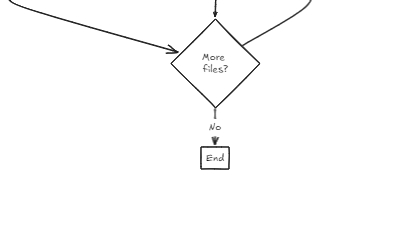
And here is a flow chart of how the code works


Get access to the script
To make it even easier for you to get started, we’ve uploaded the Excel Data Cleaner and Copier script to our GitHub account. Here’s how you can find and use it:
Visit Our GitHub Repository
- Go to GitHub: Open your web browser and visit our GitHub repository at https://github.com/Automate-Coders/Image_Editor.git
- Explore the Repository: You’ll see a list of files and folders in the repository. Look for the file named Index.py
Results
Once the script has finished running, open the editedImg folder to view your edited images. Compare them with the original images to see the difference. The edited images should be sharper and in black and white, demonstrating the power of automation with Python.
Before running the script

After running the script

Troubleshooting Common Issues
If you run into any issues, here are a few things to check:
- Ensure the
editedImgfolder exists or is correctly created by the script. - Double-check the paths to your
imagesandeditedImgfolders. - Look out for any error messages in the terminal; they often provide clues about what went wrong.
If the script fails to process an image, it will print a message telling you what the problem was, helping you quickly identify and fix any issues.
Conclusion
Automating image editing with Python is a simple yet powerful way to save time and ensure consistency across multiple files. By following this guide, you’ve learned how to set up your environment, write a script to automate the process, and troubleshoot common issues. Now, you’re ready to explore more advanced image processing tasks or apply these skills to other projects.
If you like blog post like this then you would love our other blog post like How to Remove Duplicates and Move Data in Excel Using Python

